Have you ever had one of your blog posts shared on Facebook and end up being disappointed with the thumbnail image Facebook automatically generated because it was some weird image that had nothing to do with what your post was about? Did you know that you can change that thumbnail to any image you want? You can and that’s what I’m going to show you how to do today.
I’m also going to show you how you can test it to see how it will look on Facebook without actually posting it on Facebook. You ready? Then let’s begin!
Step 1: Check Your Blog Post Or Web Page Using The Facebook Debugger Tool
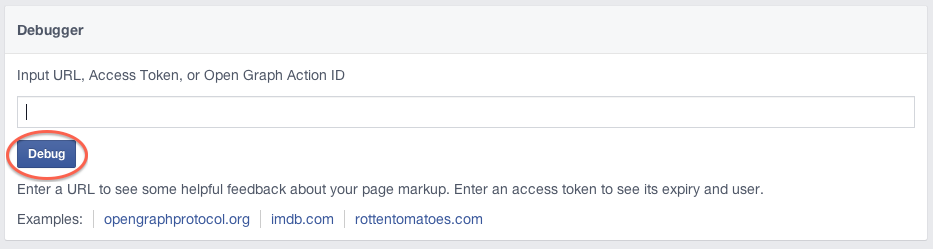
The Facebook Debugger Tool is a handy little tool that allows you to see the information that Facebook will retrieve from your blog post or web page when someone shares, Likes or posts it.
So just enter your blog post URL or web page address into the Debugger Tool and click on “Debug”.
You will now be sent to a page where about half way down you will see how it will look when someone shares your post.
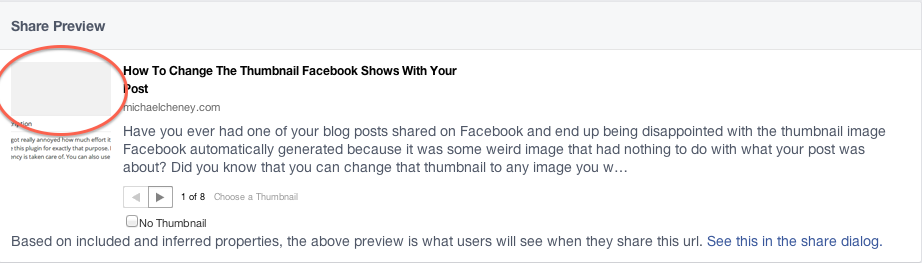
Don’t like the image that they selected? No problem. Here is what you need to do next.
Step 2: Change The Facebook Thumbnail Image You Want People To See
If you have a WordPress blog – this next part is really easy because there is cool plugin called “Per Page Head” that you can use to add the image you want to use. If you don’t use WordPress, you will need to do it manually by adding a piece of code (that I provide for you a little later) to your header using an HTML editor. I will also explain how to do that in a bit.
How To Do This If You’re Using WordPress
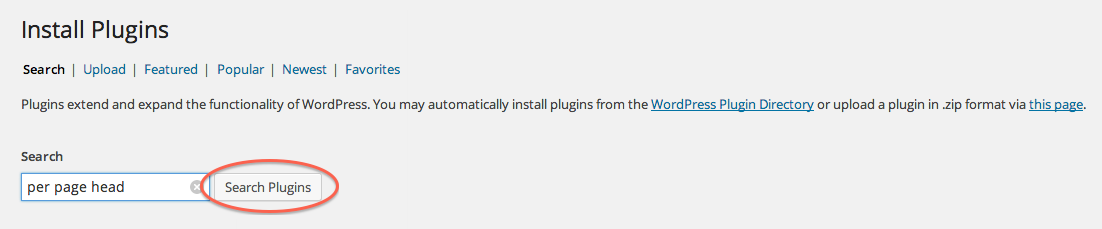
To get the Per Page Head plugin, just go to your WordPress blog dashboard and click on “plugins”. Now click on “Add New”. In the “Search” box type in Per Page Head and click “Search Plugins”.
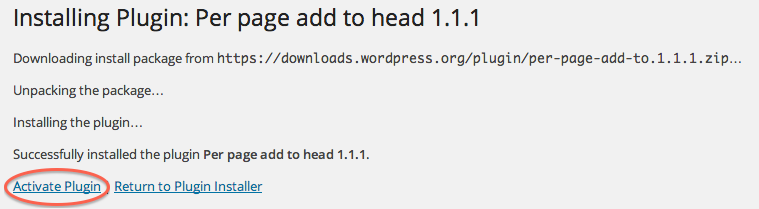
Next, click on the “Install Now” link for the Per page add to head plugin…

… and then click on the “Activate Plugin” link.
Now click on “All Posts” in your blog’s dashboard and then click on “Edit” under the blog post you want to work on. Under the box that contains the text of your blog post, you will see a section called “Add to head”. That is where you will be placing some code that will contain a link to the image that you want Facebook to use.
In this box, place the following link;
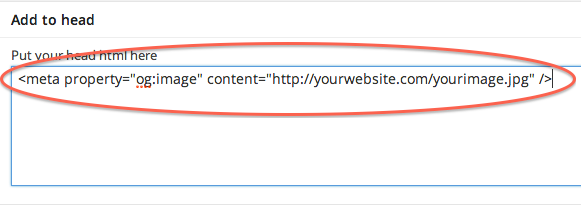
And of course, replace “http://linktoyourimage.com/image.jpg” with the URL to the location of the image on your blog that you want to use. Once you have done that, click on “Update” in your blog post to save the changes.
Now when someone shares your blog post, this image will be used. You can use the Facebook Debugger Tool again to make sure it does.
How To Do This If You’re Using A Non-Wordpress Web Page
For those of you who are not using WordPress and do your own html coding, all you need to do is open your page in an html editor. I personally use DreamWeaver but there are also free ones available.
For you Mac people – my super awesome personal assistant John has a Mac computer and uses Kompozer which is a free program.
So after you open your page in the html editor of your choice, find the “<head></head>” tags. Now place the following code anywhere between those 2 tags.
![]()
Here is what your html page could look like BEFORE you enter your code…

And here is what it could look like AFTER you place the code…

Your next step would be to replace “http://linktoyourimage.com/image.jpg” with the URL to the location of the image that you want to use. Once you have done that, save your changes and upload your updated page to your website.
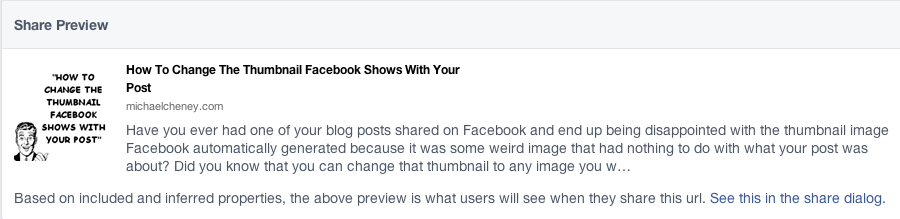
Enter the URL of your page in the Facebook Debugger Tool again and take a look at how it looks now.
Doesn’t that look better? Now you can control exactly what image is used when sharing your blog posts on Facebook. And that is a HUGE advantage for your marketing!